
SYNC Desk - Reservations Menu Bar Area


This area contains a variety of functions used to manage reservations. Each function will be individually discussed below.
Add New Reservation Button

The Add New Reservation button is used to create a new reservation.
Adding a New Reservation
- Click on the Add New Reservation button, and the following page will be displayed:

Now, either drag and drop the desired time period for a resource on the grid, or double click on the resource to make a reservation using the default time period.

In this example, a box was dragged on the grid from 2:00 PM until 4:00 PM for both lanes 1 and 2. The result of the drag and drop action will appear as follows:

The background color of the New Reservation will vary by facility. The default reservation type is the first reservation type in the menu, which is sorted alphabetically. When the drag and drop operation is completed, the following Reservation Details page will automatically be displayed, so that changes to the details of this reservation can be made.

- Use the Party Name field to enter the name for this reservation.

After a name has been entered, the name entered will display on the grid and relevant printed documents:

- A company name may be entered here, if desired:

The Company Name will not be displayed on the grid, but if the search function is used, then both the Party Name and Company name fields will be queried.

The next step is to enter contact information for this reservation. There are two options: Click on the magnifier glass button to query the names database on the Sync server, or Click on the pencil icon to enter a new name into the names database on the Sync server.
Searching for a Name
Click on the magnifier glass button and the following will be displayed:

Enter any known information about the person being searched for in these fields, and then, click on the Search button. If no information has been entered, the entire list will be displayed:

Select the desired person and then click the OK button. If the desired person is not found in the database, then click on the Add New Person button to enter their information.

Enter the information about the person and then press the OK button.

This person will then automatically be selected as the contact person for this reservation:

Adding a New Name
Click on the pencil icon button and the following will be displayed:

Enter the known information about this person and then click the OK button to save it, or press the cancel button to exit without saving it. If a new person is added this way, they will automatically be selected as the contact person for this reservation:
5. The Account field will display the name of the deposit account, selected in the next step, that contains this party’s deposit or pre-payment amounts, if any.
6. Click the plus icon "Add" button to enter a deposit or pre-payment amount for this reservation, if desired. If the Add button was clicked, then the following will be displayed:

7. Click here to select the desired Account category, if necessary.
8. Select the desired account from the list, if possible:

or, Click the Create New Account button, to create a new deposit pre-payment account, and the following will be displayed:

9. Enter the deposit account’s name in the Name field. It is recommended that a separate account is made for each reservation. This creates a one to one relationship between each reservation and deposit account. However, some facilities prefer to make one deposit account for all parties of a particular type. This makes reconciliation more difficult, because the account balance is the net total of all credit and debit transactions for all parties of a particular type, rather than a credits and debits for a single party in a single account. It is recommended that the deposit account name references the party name and the date of the event. In this example, Dunbar 5/24/2024 was entered as the deposit name. This naming convention will make deleting used deposit accounts easier at a later date in the Office application The Balance field shows the net balance of all transactions in this account. As it is a new account, there currently isn’t a balance displayed.
10. The Max Charge field should be left at zero for a deposit account. A zero max charge amount prevents users from debiting this account for more than the balance in the account. If this account should allow charges then enter the credit limit for this account. Generally, this is uncommon for a deposit account.
11. The PIN field is used to enter a 4 digit number, that must be entered in order to make a credit or debit against this account.
12. Click on the Account Category drop down menu to select an Account Category for this account. Account Categories are created in the Sync Office application on the Analysis page. They are used to group accounts together on the Account reports. Common Account Categories are: Invoices, Party Deposits and Corporate Deposits. Selecting an Account Category will automatically display the Account Type associated with the selected Account Category. For example, the Birthday Party Account Category was selected and the Account Type was automatically set to Event. This association was made when the Account Category was created and is also used for grouping and filtering on reports.

13. Select the OK button to create the account, or press the Cancel button to exit without creating a new account.

14. Now that an account has been created or selected from the list, use the keypad to enter the amount being deposited. When done, the balance will be credited with the amount entered and displayed as a positive number:

In this example, $50.00 was entered. When OK is pressed, the balance will be updated, once the payment has been completed and the following payment page will be displayed:

The receipt area shows the name of the account being credited and the amount of the credit. The total is displayed at the bottom of the receipt. If products or packages are to be added to the reservation, they can either be sold now, or at a later time during this process.
15. To make the payment for just the account deposit, click on the Pay Now button and complete the payment steps. When complete, the reservation will be updated:

The deposit account and this reservation are now linked together.

The Logo field is used to display the name of a file that will be displayed during the welcome process on the scorer’s overhead monitor. If this field is blank, the default logo, if any, will be displayed.
16. Click on the magnifier glass Search button to open the Windows File Explorer, to select the desired logo file.

17. The greeting field is used to enter a customized text welcome message to be displayed on the scorer’s overhead monitor during the welcome process, if desired.

18. The Reservation Type drop down menu, displays the list of reservation types that were created in the Sync office application. The reservation type controls the color of the reservation on the grid and default duration. Click here to select the desired reservation type from the list.

19. The Repeats drop down menu is used to create a repeating reservation. This is handy for events that come every week for a whole season, such as a school group or league. Click here to select a repeating reservation type from the list:
None – This type will not repeat.
Daily – This type will repeat every day until the date selected in the Until field.
Weekly – This type will repeat once a week on the same day until the date selected in the Until field.
Bi-Weekly – This type will repeat every other week until the date selected in the Until field.
Monthly By Date -This type will repeat once every month on the selected date, until the date selected in the Until field.
Monthly by Day - This type will repeat every month on the selected day of the week until the date selected in the Until field.
Annually – This type will repeat once a year on the selected date of the month until the date selected in the Until field.
The Until field, is used to set the end date of repeating reservations when necessary.

20. The start time control and end time control are used to display the starting and ending times for this reservation, as selected on the grid when the reservation was created. Additionally, the up and down arrows in the start and end time controls can be used to modify the starting and ending times of the reservation.

21. The Confirmed radio button is used to control whether or not this reservation has been re-confirmed since it was originally created. It is common for a facility to contact the customer to verify the contents of the reservation, and make changes as necessary, typically one week before the reservation is scheduled.

22. The comments field is used by the staff to enter comments about this reservation, as well as display a history log of who modified this reservation and when.

23. The Reservation Details button, is used to either expand the select reservation, so that the details can be seen and edited, or collapse the existing reservation so that the entire reservation grid can be accessed, so that a another new reservation can be created.

24. The Current Invoice button will display the sales page and the current receipt:

25. It is this page that can be used to attach packages or products to this reservation. Any type of package or product may be attached to the reservation. Sales on this page proceed in the same manner as on the Lane Sales or POS Sales view panels. Select a group then a product or package and enter the quantity desired:

In this example, a Buffalo Chicken Flatbread was added to the receipt. The cost of the item added was automatically deducted from the amount in the deposit account that was previously attached to this reservation.

26. The Invoice History button is used to display a log of changes made to the reservation receipt or invoice:

Click on a line item to view the changes made in that instance. Press the Cancel button when done viewing the invoice history.

27. The Host Reservation button is used on the day of the event to issue the resources associated with the reservation, such as lanes or billiard tables, and to send any food items on the invoice to the ticket printers, if equipped:

28. Select the desired resources for this event. If a resource was previously selected when the reservation was created, then that resource will automatically be selected now, but the user could change the resource assigned at the last moment, due to conflicts. Then select the desired package or product, if it had not already been done so previously.

29. The Lane on screen will be displayed, if the reservation invoice contains a lane resource. Enter the desired information and complete the sale, as desired.

30. When the invoice has been hosted, two things will change on the reservation grid. First, the selected resource will indicate that it is in use, and second, the reservation type will show hash marks through the reservation type background color to indicate that it has been issued:

31. The Print Summary button is used to view and/or print a summary of the entire reservation. Click here to generate the Reservation Summary:


32. The Delete Resource button is used to remove a resource from the reservation. Click on the desired resource to highlight it and the click on the Delete Resource button to remove it from the reservation.

33. The Change Date button is used to change the date of this reservation. Click here to open a calendar control, then select the new date and press the OK button to save the date change, or the Cancel button to end the process without changing the date.
34. The Send Email button is used to send a summary of this reservation to the e-mail address that was entered for the contact person. Click here, and the following will be displayed:

Press the OK button to send the summary e-mail or press the cancel button to exit without sending the e-mail
Note: The domain used as the sender of the e-mail will be the facilities e-mail domain, if the print server was configured in the Office application on the Admin page. If the cloud print option was selected instead, on the Sales>POS Policies Page>Reservations tab, the summary e-mail domain will be @brunswickcloud.com

35. The Guest List button is used to enter the player names for lane resources. Click here and the following will be displayed:

This section of the Guest List is used to enter the party name and a player on the list at the same time. Enter the name in the Party field. If the player being entered is the VIP, then click on the List VIP option. The List VIP is so designated on the Guest List Receipt print out:

The Phone field is used to enter the telephone number of the namesake of the group. This number can be used to send a text (SMS) message via the Twilio platform, which is an optional service.
The E-mail field is used to enter the e-mail address of the namesake of the group.
Click the “Add as Guest” button to add the namesake of the group to the list of players in the group and the following will be displayed:

In this section, players can be individually added to the wait list. Enter a name in the Guest field:

The Guest VIP Option is used to indicate that this individual is a VIP. The Guest VIP is so designated on the Guest List Receipt print out:

Click on the Add button to add the named individual to the list, and the following will be displayed:

The final way to add players to the guest list, is en masse. Click here on the Quick Add button to enter the number of players to be added to the list, and the following will be displayed:

Select the desired number of players to be added to the list and click on close. If the desired number of players isn’t listed, click the more button and enter it manually. Click on the Clear button to enter zero.

In this example, 3 players was selected. Click on the Add button to add three default players to the list:

Three additional players have been added to the list.
Once players have been added to the player list, the individual options may be set for each player. The following choices may be available:
If the lanes are equipped with automatic bumpers, then click in the circle to the left of the players that should have bumpers activated.
In the next column, the name of the players may be updated.

In the next column, the player’s shoe size may be entered.

In this column, the players ball weight may be entered.
These three columns are the “Add Ons” that were selected for sale during the lane on process. They are duplicated here. To “pre-sell an Add On, place a check mark in the circle next to the player that will buy the add on. Add ons are configured in the Sync Office application, on the Admin page, using the Resource Type Definitions menu item.
The e-mail buttons in the next column are used to enter individual e-mail addresses for each player. The e-mail address is used by the Brunswick Cloud to send scoresheet e-mails to the players after the bowling event has been completed.
The Group number is used to split the guest list party amongst multiple lanes. If the same group number is used for all players, then they will all be assigned to the same lane. However, players in group 1 will be assigned to the first lane of the lane range; players in group 2 will be assigned to the second lane range, and so on.
The Product buttons in this column, is used to select an individual product for each player. Click on a product button to select a rate for a player, and a similar window, based on the facility, will be displayed:

Select the desired Group from the Group list.
Select the desired package from the center column, or select the desired product from the list on the right.
The Quantity button is used to pre-set a quantity of games for each player. Click on the Qty button and the following will be displayed:

Select the desired quantity of games from the list and then press the close button. If the desired quantity isn’t listed, select the more button and enter it manually. Click on the clear button to enter zero.
The Mode drop down menus are used to select the type of scoring that will be used for each player. Click here to display the list of options and the following will be displayed:

- The following options are available:
- None, which means this bowler will not be using No Tap scoring, and will need to bowl ten pins over on the first ball of a frame to score a strike.
- 6 Pin No Tap, which means this bowler will be using No Tap scoring, and will score a strike if six or more pins are bowled over on the first ball of a frame.
- 7 Pin No Tap, which means this bowler will be using No Tap scoring, and will score a strike if seven or more pins are bowled over on the first ball of a frame.
- 8 Pin No Tap, which means this bowler will be using No Tap scoring, and will score a strike if eight or more pins are bowled over on the first ball of a frame.9 Pin No Tap, which means this bowler will be using No Tap scoring, and will score a strike if nine or more pins are bowled over on the first ball of a frame.
The Delete button is used to delete the selected player from the wait list.
When the Guest List is complete, press the OK button to save the Guest list and exit, or press the Cancel button to exit without adding this group to the Guest list,

Click on the Save button to save all of the changes and exit, or press the Cancel button to exit without saving the reservation.
Edit Reservation Button

The Edit Reservation button is used to modify an existing reservation.
To edit a reservation, first click on the desired reservation on the grid:

The selected reservation will be highlighted.

Now click on the Edit button:

And the following will be displayed:

- Make the desired changes and press the Save button to save the changes and exit, or press the Cancel button to exit without saving the changes.
Search for a Reservation Button

The Search button is used to find an existing reservation.
Click on the Search button, and the following will be displayed:

Select the desired search date on the calendar and press the filter button to display all of the reservations for that date. OR, select the desired date and enter filter conditions to narrow the list to what matches the data entered and press the filter button.

Select the desired reservation from the list and press the OK button to edit it.
Make the desired changes and press the Save button save the changes and exit, or press the Cancel button to exit without saving the changes.
Print a Reservation Button

The Print button is used to print out the reservation grid. This can be useful to other parts of the facility, such as food and beverage managers, so they understand what activities are occurring.
Select the print button and the following will be displayed:

Select the desired date range and the desired resources:

Place a checkmark next to the resources that should be included in the report, or remove checkmarks from resources that shouldn’t be in the report.
Select the desired reservation types by placing a checkmark next to them, or remove a reservation type from the list by remove the checkmark:

Select the desired report types:
Schedule – Prints the reservation grid for each date selected:

Details – Prints a summary of each reservation for the dates selected:

Reservation Details Button

The Reservation Details button is used to display the details of a reservation.
Select the desired reservation on the grid:

Click on the Reservation Details button:

and the following summary of the reservation will be displayed:

Reservations Grid Area
The Reservations Grid area displays the selected resource for today’s date, or any other calendar date, if selected. The resources are on the far left and the time is across the top. The scroll bars may be used to view other parts of the grid, if it doesn’t all fit on one page.
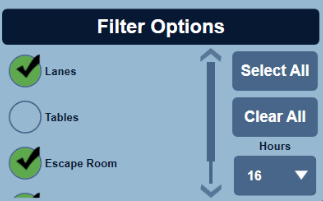
Filter Button
The Filter button is used to change the content and appearance of the grid.

-
Click here to open the filter mane, and the following will be displayed:
- Place checkmarks next to the resources that should be displayed, and remove checkmarks from the resources that should not be displayed. Click on the Select All button to quickly select of the resources, or click on the Clear All button to remove the checkmarks from all of the resources.
-
Use the Hours drop down menu to select how many hours are displayed in the viewing window. The options are:
8, 12, 16 and 24 hours.
For more information or to book a training session email support@bowlingvision.com or call 03301220252